
Saturday, 28 July 2012
Fantasy Castle
Tuesday, 17 July 2012
Mountainous Landscape

Thursday, 28 June 2012
Single Poppy Card

Sorry, there seems to be a bit of a theme developing here but I do love poppies, they are my favourite flower.
Again this was a stamped design from Sheens Douglass over painted with one stroke painting techniques. The white card was innked with 3 different colours of green distress ink which was sprinkled with water and some of the ink lifted off to give a speckled effect.
The image was matted and layered onto an A5 white base card. The largest mat was white card sprayed with mica sprays to give a nice bit of shimmer.
For the embellishment I use a piece of flower shaped ribbon with flat backed crystals and pearls for the flower centres. It is quite a simple card but I think it looks quite striking.
Wednesday, 27 June 2012
Two Poppies
 Good morning.
 Here is a new card with my favourite poppies. The centre piece is the one stroke technique poppies based around stamped images from Sheena Douglass. They were painted with acrylic paints.
The background card was made by spraying white card with various tones of mica sprays. Once this was dry it was stamped with leaves from another Sheena stamp.
The base card is A5 in size and the same colour green card was used to make the layers along with one mat of satin copper card. Copper was used to compliment the copper embossing powder used around the edge of the image.
As a finshing touch vintage style lace was mounted with double sided tape and topped off with satin ribbon and a bow.
Sunday, 24 June 2012
A New Card
 Amazing. At long last I have found some time to actually make some cards. I have had a lovely morning crafting away.
I am not sure about this stamp, it is either a lovely image or quite scary! I am not sure which. The stamp is from a set from Creative Expressions.
The base card is navy blue double sided pearlescent card as it eh mount for the stamped image. The background was painted with mica pants which were allowed to run and puddle. The background for the image was smililarly made but the paint was sprayed onto a non-stick craftinh mat and the card dabbed onto it.
The large button under the two flowers was made with Fimo, stamped to get texture, wiped over with mica powder before being backed to set the clay.
The two flowers were part of a prize from a card challenge.
Tuesday, 19 June 2012
New Website up and running
At long last, we now have out business website up and running. It is still a bit of a work in progress but do pop over and have a look at http://www.designsoncraft.co.uk/. We still have to work on the shop side of it but I do have shops in both e-bay for craft supplies and Folksy for my hand crafted products.
Sunday, 13 May 2012
Another Bag Design

Here I am with another bag design. I managed to pick up a tremendous selection of chiffon and silk scarves in a charity shop the other day. I like this recycling thing (or up-cycling as some people call it!). This time the design is of a bunch of flowers rather than single stems. Again it features Swarovski crystals in the centre of each of the flowers to give it a bit of bling. The flower fabric has a purple background with a lovely floral design in various pinks.
Sunday, 29 April 2012
Embellished Bag

Well, it is certainly very wet and blustery here this morning. Definitely a day for staying indoors and crafting.
This is the first of my new bag designs made using a base bag of 100% unbleached cotton and then the flowers have been added using my embellishing machine. The leaves and stems are made from green felt. The flowers are recycled chiffon scarves. In the centre of each flower are five flat backed Swarovski (I hope I spelt that correctly!) crystals applied with hot glue to give a really strong bond.
Sunday, 25 March 2012
Fabric Fusion

Here is my first attempt at fabric fusion. This was made using acrylic felt as a base material and polyester organza for the top two layers. Basically you melt the fabrics together with a very pointy soldering iron. The black lines are where the organza has melted and you can see the black felt under it. You can cut whole sections out just using the iron and back the holes with different fabrics. It is great fun. Yes, this was something I picked up at the NEC on Friday.
The orange flat backed jewels were applied using a hot applicator (another purchase on Friday).
There is no doubt about it, I am definitely finding fabrics and textiles more interesting than paper these days I am afraid.
However, never fear, my card making days are not over, I will just put different things on them in future!
Monday, 19 March 2012
Felted Heart Key Rings

Here is a new new hand felted key ring that I produced this weekend. I think it is so cute! I actually made 4 of them with different colours of flower but all the hearts are red.
This was hand felted using a cookie cutter as a template withe the key ring assembly being firmly embedded into the felt as it was made. The flower sequin and red bicone crystal are featured on both sides of the heart. They are available from my folksy shop. See the link to my shop at the side of my blog.
Wednesday, 7 March 2012
Some New Felt Brooches
Good evening.


 I had fun over the weekend creating some felt brooches of which I have added 6 to my Folksy shop and the other 10 will go to the craft Emporium in Stonehouse which has already sold some of these for me. These were made by embellishing commercially made felt with various fibres and also some white netting, as seen on the top example. Do please pop over to the shop and have a look at the rest of the designs at Designs on Craft Folksy Shop


 I had fun over the weekend creating some felt brooches of which I have added 6 to my Folksy shop and the other 10 will go to the craft Emporium in Stonehouse which has already sold some of these for me. These were made by embellishing commercially made felt with various fibres and also some white netting, as seen on the top example. Do please pop over to the shop and have a look at the rest of the designs at Designs on Craft Folksy Shop
Friday, 24 February 2012
Business Progress.
Good morning.
Just to let you know I am still alive, I am not managing to do much crafting at the moment because of setting up our business. It is slow going at the moment but things are starting to take shape. We now have a half built website, not yet published, and a Facebook page for it too, the link for which is in the side bar.
We are going to look at some equipment this afternoon which will allow us to print ribbons, with any message we want, which is quite exciting. Assuming we purchase it, once we have seen its capabilities, we will be printing a standard range of messages but then everyone will be able to order personalised ribbons for themselves. The printing is done with foil, of which there are about 12 colours, and of course there are many ribbon colours so you can create a lot of combinations to suit the project you want it for. The great thing is you can print any length from a few centimetres to 50 metres so it will cover any project big or small. This will be great for crafters but also for cake makers, florists, weddings and all sorts of other areas.
Last Sunday I went to the biggest craft trade fair in the UK at the NEC. It was brilliant. I was like a kid in a toy shop. I came away with some brilliant ideas for us to stock in our on-line shop.... but first I have to wait for the website. So watch this space.
I'll be back soon with further updates.... and hopefully a crafted project or two too!
Love,
Shirl
Sunday, 12 February 2012
Good News
Good morning.
Life is so exciting at the moment. Keith, my partner, and I are starting on the road to setting up our own business. Of course it is craft based, selling my own products but also craft supplies (I have got my eyes on some absolutely stunning embellishments) which I am sure will appeal to you and finally Keith's photographs. We are in the very early stages as you wouldn't believe the number of hoops that you have to jump through. Keith is currently starting to build a website which will have a shop whilst I will use e-bay, folksy and etsy as other outlets. I am also hoping to expand my workshops that I started last year, not only doing them at the Craft Emporium in Stonehouse but also finding other venues or even in people's homes if they have a group of like minded friends.
I am hoping to start doing craft fairs again which I haven't done since I moved from South Wales. It seems a long time since I did the Abergavenny craft fairs which I used to really enjoy.
Please keep an eye on this blog and you will see the various links included in the future to let you know where we are. All this activity is really eating into my crafting time at the moment which is a shame but it is gong to be worth it in the long run. I am so looking forward to it.
I hope you will all keep your fingers crossed for us as we want this to be our future!
Love,
Shirl
Sunday, 22 January 2012
Felted Key Ring

My first example of felted work which is totally hand felted. No commercial felt here. This started off as a bunch of fibres. I had to make 4 flowers, exactly the same size, two for each chain on the key ring.
I drew the flower onto dissolvable fabric to give a base for the flower. Fibres were added using a hand felting tool and then the felting was completed on my embellishing machine. Orange fibres were made into the centres of the flowers which were machines in place.
A flower was placed either side of the jump ring at the end of one of the chains and sewn through to keep it in place. A few seed beads were added to give extra texture.. The two flowers were then sewn all around the edges to totally secure them in place. This was repeated for the flower on the other chain.
PS: If you liked my 8 pointed brooches yesterday, pop over the my other blog to see some 6 pointed ones which I think look quite elegant.
Saturday, 21 January 2012
Felt Brooches

 Good morning. Welcome to Saturday. Here are my first examples of felted projects. I got a 12 needle embellishing/ felting machine for Christmas and I am having great fun with it. These brooches are made from commercial felt but I have added black and silver fibres onto the white surface. The two sheets were then shaped and layered to give this look before sewing onto a brooch pin and adding the centre bead(s). The next version is on black felt with white and silver added and the final one is purple with blue wool fibres and Angelina fibres added to texture.
The next step is to create my own felt sheets from scratch. Watch this space.....!
Sunday, 8 January 2012
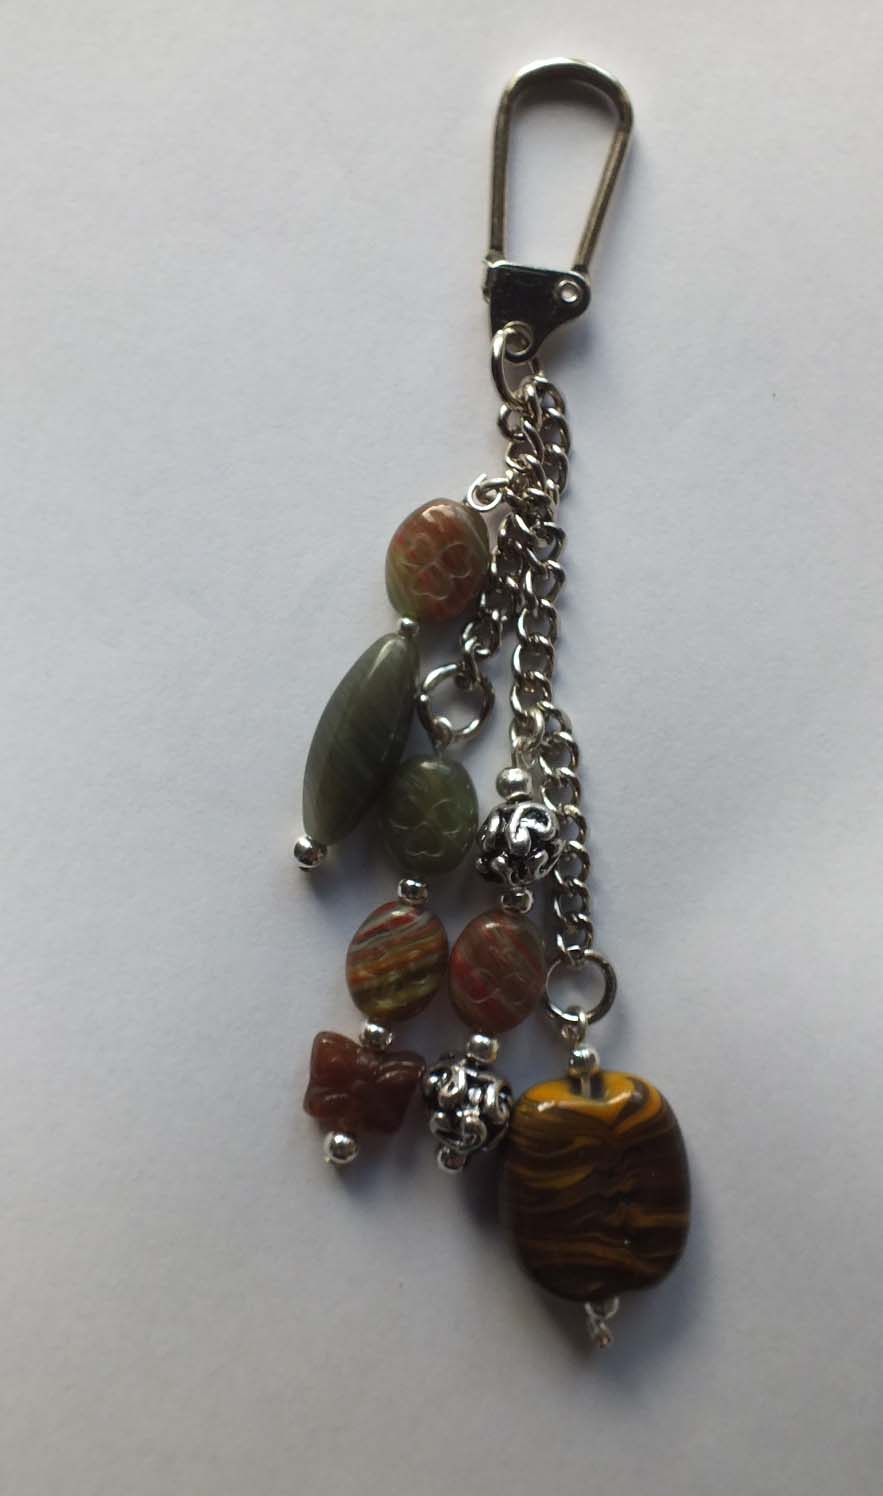
Hangbag Charms
Good morning. Well, what can I say. I am sorry I have not been around
much for a while. The strange thing is that I really do not have an excuse or even a reason. I just seem to have lost my way a bit. However, I am now trying to sort myself out so I thought I would put these pictures up as examples of some handbag charms / key rings that I have been making. A lot of the beads I already had in my stash but some of the them I purchased recently from the shop where I sell my stuff. They were made by a local glass bead crafter. She made the two black and white ones on the top picture, the two small browny orange ones on the second picture and the large brown one on the picture on the left. I will put some more examples over on my other blog.
I have some of these for sale in the shop, some on folksy and some on Ebay.It is nice to be back and I promise to try and start blogging more regularly again.

much for a while. The strange thing is that I really do not have an excuse or even a reason. I just seem to have lost my way a bit. However, I am now trying to sort myself out so I thought I would put these pictures up as examples of some handbag charms / key rings that I have been making. A lot of the beads I already had in my stash but some of the them I purchased recently from the shop where I sell my stuff. They were made by a local glass bead crafter. She made the two black and white ones on the top picture, the two small browny orange ones on the second picture and the large brown one on the picture on the left. I will put some more examples over on my other blog.

I have some of these for sale in the shop, some on folksy and some on Ebay.It is nice to be back and I promise to try and start blogging more regularly again.
Sunday, 13 November 2011
Christmas Card 1

At last I have been able to start making Christmas cards. This year, for non-family cards, I have decided to go back to basics and keep everything simple.
I apologise that this is not a brilliant picture but I am trying to get used to a new camera.
This has been created purely by doing a background with Distress inks through a mask cut with a scalloped square Spellbinder die. The Sentiment stamp is by Clarity and the image from a stamp by Creative Expressions. The red berries were created with a pearl pen. The sentiment and image were stamped using a permanent ink as this was created on a white pearl card.
Saturday, 22 October 2011
Poppies

An A5 acrylic painting of some poppies which I hope you like. It is mounted in an A4 size mount. The One Stroke painting method by Donna Dewberry has been used.
Thursday, 6 October 2011
Dragon Flight

A quick blog to show one of my encaustic pictures that I produced while doing a demonstration at the shop in Stonehouse last Friday. These are my favourite sort of colours for fantasy encaustic pictures and I just love dragons. This is A5 in size mounted in an A4 border.
The dragons were produced from two rubber stamps using Stazon ink so as not to smudge the images when the molten wax was applied over the top. All of the wax work was done with an iron.
Tuesday, 27 September 2011
I have opened a Folksy Shop
Good evening.
This is just a quick note to say that I have opened a Folksy Shop. This is a website that is dedicated to crafters selling their hand made creations. If you would like to have a look you can either click here or else on the link in the right hand bar of this blog.
I hope you like what you see. At the moment I have added examples of my encaustic art and some of my small acrylic paintings. other things will follow as time goes by.
Subscribe to:
Posts (Atom)