Here is a card for the Sketch and Stash Challenge no 96
The main image was created using a Versamark embossing pad, clear embossing powder and a beautiful stamp by Sheena Douglass. Once the image was embossed Broken China, Faded Jeans and Chipped Sapphire Distress Inks were used to colour the background. The ink does not stick to the embossing which acts as a resist so it was wiped off.
The background and the strip of card were white card which was treated with yellow, blue and green marbling inks. These were matted onto black and white card. The same was done for the sentiment which is from another Sheena stamp.
The stash element for the challenge consists of the flowers which were a prize last year from another challenge.
A crafter of many years, interested in many types of creative enterprises. I decided it was time to enter the 21st century and put this out to the big wide world
Showing posts with label Flowers. Show all posts
Tuesday, 11 September 2012
Sunday, 24 June 2012
A New Card
Amazing. At long last I have found some time to actually make some cards. I have had a lovely morning crafting away.I am not sure about this stamp, it is either a lovely image or quite scary! I am not sure which. The stamp is from a set from Creative Expressions.
The base card is navy blue double sided pearlescent card as it eh mount for the stamped image. The background was painted with mica pants which were allowed to run and puddle. The background for the image was smililarly made but the paint was sprayed onto a non-stick craftinh mat and the card dabbed onto it.
The large button under the two flowers was made with Fimo, stamped to get texture, wiped over with mica powder before being backed to set the clay.
The two flowers were part of a prize from a card challenge.
Sunday, 13 May 2012
Another Bag Design
Good morning.
Here I am with another bag design. I managed to pick up a tremendous selection of chiffon and silk scarves in a charity shop the other day. I like this recycling thing (or up-cycling as some people call it!). This time the design is of a bunch of flowers rather than single stems. Again it features Swarovski crystals in the centre of each of the flowers to give it a bit of bling. The flower fabric has a purple background with a lovely floral design in various pinks.
Labels:
Embellishing Machine,
Felt,
Felting Machine,
Flowers,
Swarovski Crystals
Sunday, 29 April 2012
Embellished Bag
Good morning.
Well, it is certainly very wet and blustery here this morning. Definitely a day for staying indoors and crafting.
This is the first of my new bag designs made using a base bag of 100% unbleached cotton and then the flowers have been added using my embellishing machine. The leaves and stems are made from green felt. The flowers are recycled chiffon scarves. In the centre of each flower are five flat backed Swarovski (I hope I spelt that correctly!) crystals applied with hot glue to give a really strong bond.
Labels:
Embellishing Machine,
Felt,
Felting Machine,
Flowers,
Swarovski Crystals
Sunday, 22 January 2012
Felted Key Ring
Good afternoon.
My first example of felted work which is totally hand felted. No commercial felt here. This started off as a bunch of fibres. I had to make 4 flowers, exactly the same size, two for each chain on the key ring.
I drew the flower onto dissolvable fabric to give a base for the flower. Fibres were added using a hand felting tool and then the felting was completed on my embellishing machine. Orange fibres were made into the centres of the flowers which were machines in place.
A flower was placed either side of the jump ring at the end of one of the chains and sewn through to keep it in place. A few seed beads were added to give extra texture.. The two flowers were then sewn all around the edges to totally secure them in place. This was repeated for the flower on the other chain.
PS: If you liked my 8 pointed brooches yesterday, pop over the my other blog to see some 6 pointed ones which I think look quite elegant.
Labels:
Embellishing Machine,
Felt,
Felting Machine,
Flowers,
Handbag Charms,
key rings
Wednesday, 13 July 2011
Flowers - One Layer Card
Good morning.
This card if for the Crafty Cardmakers #50 Challenge and what a challenge it was too. The one layer technique is exactly what it says - put your image straight onto the card blank with little or no embellishment.
For this A5 card I chose to use the Donna Dewberry one stroke painting method. Unlike Sheena Douglass' paint fusion technique, this is done without the aid of the safety net of using stamps to give you an outline to paint. This is done entirely by hand starting with an clean sheet of card!
Once the paint had dried overnight, I tinted the edges with Dusty Concord Distress Ink and stamped "With Love" in the bottom right hand corner with green ink. Stamp by Sheena Douglass.
I only started trying this technique last weekend so I am delighted with the results. I hope you like it too.
Monday, 4 July 2011
Summer Time
Good evening.
here is a card for 2 challenges:
Totally Papercrafts Eyes down, Look in and let's play bingo from which I chose ribbons, brads and flowers
Crafty Catz #89 - Colours of Summer
Stamps used - Sea scene - Chocolate baroque
Daisy - Sheena Douglass.
The scene was stamped with Stazon on water colour paper, coloured with Distress Ink, cut out and embossed with a Nestie and matted onto the yellow Nestie shape which was edge tinted with Wild Honey distress ink.
The flowery back ground paper was some that I have had for years. This was layered onto yellow card and attached with orange brads. The yellow and orange ribbons were plaited wrapped around the edge of the matted layers and secured in position on the front (where it would be hidden by the image) with Pinflair glue. This assembly was attached to the A5 orangy-yellow base card.
The image was attached to the front of the card with more Pinflair glue, raising it quite high to clear the ribbons.
The daisies were stamped on to white card and painted using Sheena's fusion techniques. When dry they were cut out and again Pinflair glue was used to attach them to the card.
Labels:
Chocolate Baroque,
Flowers,
Paint Fusion,
Sheena Douglass
Sunday, 26 June 2011
Stripes, Dots and Hearts
Good morning. Sunday again already.
Here is a card for two challenges:
Totally Papercrafts #72 - Spots and Stripes
Crafty Catz #88 - Add a Charm
I went for lovely bright summery colours to go with the beautiful yellow daisies. The striped paper I have had for years but I thought it suited this one well. The dots are embossed on a large Nestie scalloped heart and the edges tinted with Wild Honey Distress ink to pick up on the dots.
The charm, a cute little daisy which was part of a pack that were a prize from a challenge I won.
The dimensional flower was created using the new Carnation Creations Nesties (I thought they could double up as a daisy too!). It was coloured with Wild Honey and Spiced Marmalade inks and assembled with a bright yellow brad. The flourishes were also cut with Nesties and coloured with Wild Honey.
The main image is one of the lovely stamps by Sheena Douglass for the Paint Fusion technique. It was stamped onto a mount board heart with a crackle background, painted and edged with gold embossing. When mounting everything on the A5 size blank card I used DS tape for the layering and Pinflair glue for the two hearts, flower and flourishes.
Labels:
Charm,
Flowers,
Hearts,
Nesties,
Paint Fusion,
Sheena Douglass
Thursday, 23 June 2011
Life
Good morning.
Here is a card for 2 challenges:
Critter #70 - Sketch
Spotlight Challenge - Sentimental
For this the sentiment had to be the main item and so I hope that the Critter team forgive me for moving the sentiment to the main image position.
I think this sentiment is lovely - Life is not measured by the breaths we take but by the moments that take our breath away. This is from a Clarity stamp.
The sentiment was stamped in Dark Green Brilliance ink on a piece of my hand marbled card. A frame was cut with a Nestie from another piece of marbled card. This was bonded in place around the sentiment and the card trimmed to the edges of the frame.
Two strips of lilac ribbon were bonded in position with Stick and Stay. A double bow, using satin edged organza ribbon and satin ribbon., was manufactured using the bow maker on my Ultimate Pro.
The base card is A5 in size made from an A4 sheet of a beautifully textured lilac card. The framed sentiment was bonded in place with DS tape. The bow as added and the ribbon tails carefully bonded in place to give some dimension with the rippling effect.
The flower and leaf arrangement was made from an MCS die cut sheet with a large crystal gem in the middle for shine.
Sunday, 12 June 2011
Summer Flowers
Good morning. Happy Sunday. It's a bit wet but who cares when these is so much crafting to be done.
This is my entry for the Totally Papercrafts #70 - Summer challenge. Summer to me means flowers and lots of them.
This is an A5 size card. The background paper was created using marbling techniques starting with plain white card. I love the patterns this creates.
The main image is from Sheena Douglass' Pansy stamps from her Paint Fusion range. Once stamped onto mount board the flowers and leaves were painted in acrylic paints and the board was framed using a gold Krylon pen.
The lime green open weave hessian strip is something that I have had kicking around in my stash for years.
The butterfly and the flowers are made from some pre-printed flowers on a plastic base which when heated can be moulded into the required shape.
The main image, the butterfly and the flowers were bonded to the card with Pinflair glue.
Thursday, 9 June 2011
Leaves and Flowers
Good morning.
Here is a card for 2 challenges:
Die Cut Dreams - Recipe
Critter Challenge #68 - Let's get Crafty
The recipe was three stamps, three flowers and a bow. The "Let's get Crafty" element was to incorporate Kraft paper into the design.
Well, the whole of the front of the card is made from Kraft paper which was screwed up, unscrewed a bit, wiped with two colours of Distress ink to catch the peaks on the paper, sprayed with water to make the inks blend, and finally given a spritz with Glimmer Mist to give it a shine. It was then allowed to dry thoroughly before being put through a Xyron machine to add adhesive to the back so it could be well stuck to the front of the A5 base card.
The stamped elements are the leaves and sentiment from Sheena Douglass. The Tag was coloured with distress inks applied with a blending tool. The sentiment was added using Timber Stazon. The leaves were stamped and embossed with copper embossing powder. These were coloured with Twinkling H2Os and then cut out. Pinflair glue was used to arrange the leaves so that the sentiment was framed.
The flowers were made by cutting flower shapes out on a Cricut. These were then inked up and aged with Distress ink. The flowers were created by layering up 3 sizes of petals which were shaped around a pencil. The copper flowers centres were made with Pearlidoodles. Pinflair glue was used to bond them in place.
The bow is very small made from a goldy coloured organza ribbon and finishes the design off at the hole in the tag.
Sunday, 5 June 2011
Pink and Orange
I don't know, you don't see a blog from me for ages and then they all come along at once!
Hmmmm, pink and orange, not my favourite combination but this card is for the Crafty Creations #121 - Pink and Orange challenge.
The stamped image is from a stamp by Creative Expressions. The background for this was created from a white piece of card which had distress ink applied from a non-stick craft mat where it had been spritzed with water, After the first go, I dried it and then re-dipped it until I got the effect I was looking for.
The image was stamped with graphite black ink and embossed with clear powder. A tinted edge of distress ink was added and then gold embossing powder was added round the edges.
The flowery edge to the pink and orange card was made with a Martha Stewart punch.
The flowers were made from MCS pre-printed die cut sheets. The flowers were pushed out from the sheets and curled and layered with Pinflair glue. Ultra fine glitter was added to the edges of the petals to add some shine and interest.
Saturday, 21 May 2011
Poppies
Good afternoon. Happy Saturday.
Sorry for not being around for a couple of weeks. We went up to Northumberland for a holiday and there was no broadband , mobile service or anything. Shock, horror! Still, I am back now with a card for 5 challenges to make up for it.
CES Challenge #37 - Embellish It. - 3 different types of embellishments required
Crafty Catz #83 - Anything Goes
Totally papercrafts #67 -- Don't be Square - any shape of card but square
Crafty Creations #119 - Mayflowers - flowers, patterned paper and ribbon
Sentimental Sundays #55 - Handmade flowers (and a sentiment)
The base card was card from and A5 pearl cream card using a Grand Nestie. The backing paper (Joanna Sheen) was cut from the next size down and the sentiment card from the smallest of the series, again from the Pearl card.
The gorgeous sentiment, (Elusive Images - or Chocolate Baroque as they are now known), stamped in red chalk ink says - "Feeling gratitude and not expressing it, is like wrapping a present and not giving it".
The flowers were printed from a MCS CD rom, layered up with Pinflair glue and the flowers highlighted with crystal glitter.
The ribbon was wrapped around the bottom of the sentiment which was then mounted onto the backing paper and base card. The bow and flowers were added with more Pinflair glue and the swirl of individual crystal gems finished the card with a bit of bling.
Sunday, 1 May 2011
Daisies
Wow, 2 posts in one morning! I obviously have some catching up to do!
This is a card for two challenges:
CES Challenge #34 - Inspirational picture from which I took the gingham and flower elements.
Crafty Catz Weekly Challenge #80 - Congratulations
The image was created with Sheena Douglass' Paint Fusion techniques and using the Daisy set of stamps to create the picture before applying the acrylic paint. A thin laminate of wood was used as the substrate for painting on and I made a simple crackle background before starting to paint the flowers.
The card is A5 in size in a gorgeous turquoise blue. Layered onto this is navy blue, blue gingham, turquoise blue and then the image which has been framed using a gold Krylon pen.
To match this, the word Congratulations was stamped using an Elusive Image (now Chocolate Baroque) stamp with Versamark ink and gold Cosmic Shimmer embossing powder.
A turquoise ribbon and bow completes the look.
Labels:
Chocolate Baroque,
daisies.,
Flowers,
Paint Fusion,
Sheena Douglass
Tuesday, 26 April 2011
Spring Flowers
Good morning.
Well, I hope you all had a good Easter break. It went by all to quickly didn't it. Still, there is another long weekend just around the corner!
Here is a card for the CES Challenge #33 - Spring Colours or Image.
What can be more indicative for Spring than flowers. All the stamps used are by Clarity including a Clever Corner, Daffodil, Primrose and Bluebells. I have used some nice fresh greens to add more spring colour.
The Clever corner was used to stamp floral framess, on silk finish card. The images were stamped within the frames, coloured with Aquamarkers and cut out. Each image was mounted on a double mat of Nestabilities in light and dark green.
The background layer was made from white card and alcohol inks with a little bit of gold mixative added for richness. The lace edging was added to the back of this layer once the card had been trimmed to the required size.
The base A5 card is in a lovely Spring green. The gorgeous beaded trim was bonded to the base card before the assembly of lace and background card was stuck into place. The three motifs were then mounted in place with foam pads.
Monday, 14 March 2011
Yellow Rose - A card for 5 challenges.
Good evening. Here is a nice bright easel card which I am going to enter in 5 challenges:
Totally Papercrafts #57 - Shaped cards
Crafty Catz Weekly challenge - Colour Combo, Yellow and Green
The Stamp Man #18 - Mother's Day - Floral Theme
Sentimental Sundays #46 - Let's go Green (Colour or Recycled) + a sentiment
Diecut Dreams Challenge #85 Mothers Day or Special Friend
To create the shape I used Grand Nesties in both Scalloped Ovals and Ovals on both pale yellow hammered card and plain green card. Many of these were cut, matted and layered to give the final look. The largest plain oval was stamped with a flourish stamp (Creative Expressions) using Shabby Shutters Distress Ink.
The large central rose, the leaves, the smaller rose on the base of the easel and the sentiment are all stamps by Creative Expressions. They were stamped on white card, coloured with Distress inks and Aquamarkers.
The double bow incorporates both pale yellow organza ribbon with satin edges and pale green satin ribbon.
The sentiment says: "If I had a rose for every time I thought of you, I'd be picking roses for a life time." My Mum passed away nearly 3 years ago so I don't have one to give the card to but I do think of her a lot.
Sunday, 6 March 2011
Paint Fusion - Flowers
Good morning. Happy Sunday.
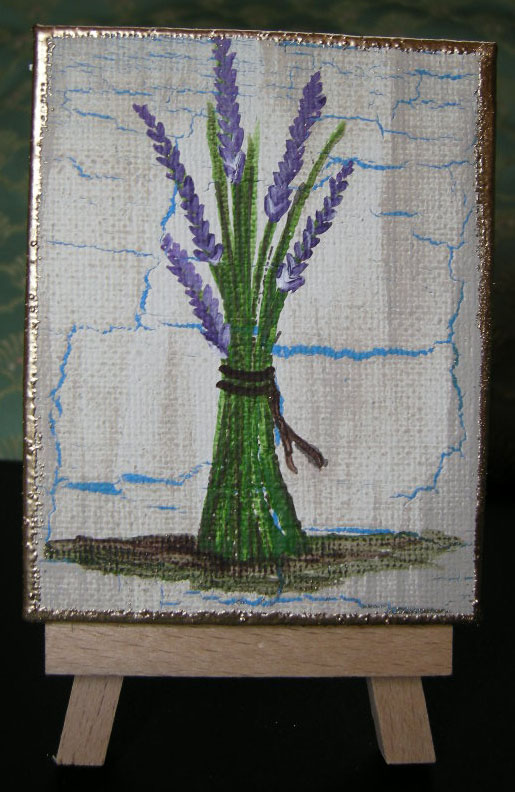
I have been so busy doing cards for challenges that I have not been doing other crafting activities. So today I thought I would post two mini canvases that I have just completed using Sheena Douglass' new Paint Fusion techniques.
These mini canvases on wooden frames are only about 3 x2.25 inches but they are interesting to work with. Both canvases were painted blue with emulsion, and when dry a layer of watered down PVA glue was applied. When this was nearly dry then the cream emulsion was brushed over the top. When left to dry the cream pain crackled so that the blue paint beneath can be seen.
Supporting the back of the canvas, the garland stamp was applied to one and the lavender stalks to the other. These were then painted with acrylic paints following the techniques provided by Sheena.
The aged effect was done using Distress inks and then gold embossing powder was applied around the edges to provide a a frame.
I was quite pleased with the results as these were only my 3rd and 4th attempts using these techniques. I can see myself spending quite a lot of time with this craft once I have moved. I don't know if there will be much crafting time for the next month or so but I will try and enter a couple of challenges a week if I can.
Tuesday, 1 March 2011
Flowers, Butterflies and Friends
Good morning. I have not posted for over a week and for that I apologise. Within the month we will have moved house, I will have moved jobs and we will be starting a new life! Consequently postings may be limited for a while but I hope you stay with me. In the new house I will have a whole room in which to craft so the sky will be the limit!
This card is for 5 challenges:
Crafty Catz Challenge 71 - Friendship
The Stampman #17 Curls and Swirls
CES Challenge #25 Flowers and Flutterbys
Sentimental Sundays - Anything Goes (with a Sentiment)
Critter Challenge#54 - Sentiment
A quick description today I am afraid.
A5 yellow A5 base card, border cut with a Martha Stewart punch and lined with dark red card to show off the edging.
Background card - started off orange and was inked with various Distress inks and stamped with a flourish stamp in Stazon to give a soft effect.
Cream tag coloured with the same Distress inks. Stamped with Poppies and embossed with gold sparkle WOW powder. Also added a For You stamp in the same way. Poppies coloured with Aquamarkers. Butterflies stamped, embossed with gold powder and coloured with Aquamarkers. The butterflies were cut out and wire antennae added with Pinflair glue.
Sentiment stamped in blackink on orange card and embossed with clear holographic powder. Cut out with a flower shaped Nestie as were the two layers onto which the wards are matted.
Swirls cut out with a Cricut...no I did not do them by hand!!
Everything was then assembled after adding a ribbon to the tag.
For You, Poppies and Sentiment by Sheena Douglass. Butterfly from Elusive Images.
Sunday, 13 February 2011
You Inspire Me!
For my second post of the day is a card for the Crafty Creations #105 - Three Little Words.
The butterflies, flower stamp and the sentiment are all by Elusive Images.
The main flower image and the large and small butterflies was stamped on glossy card with black ink and coloured with Promarkers. before being cut out.
The layer beneath the main image was made from white card which was dipped in various shades of blue and lilac Distress ink which had been splodged onto a craft mat and spritzed with water until a pleasing effect was obtained.
This layer and the black layer beneath were cut out with Grand Nesties. The sentiment was cut out with the same style of Nestie (as was the black gloss layer beneath). The sentiment was coloured with the same Distress inks, applied with a blender tool whilst it was still in the die. This gives the contrasting white edge.
The base card is made from lilac textured card, A5 in size. This has been used in a "tent" configuration with the ribbon wrapped round about an inch from the fold and ties with a bow. The main image was added with D-S tape to keep it flat tot eh base card. The sentiment and the butterflies were added with foam pads.
Have a good Sunday, one and all.
Sunday, 30 January 2011
Oriental Lady
Good morning and Happy Sunday to you all.
A card for the The Stampman Challenge #15 - Oriental and .Sentimental Sundays #40 Chinese New Year
I decided to stay with the red, blank and gold theme for this so I started off with an A5 black base card.
The background was white card which was sprayed with Scarlet and Raven Glimmer Mist sprays. Once dry this was stamped randomly, using Versamark ink, with the same flower stamp that you can see on the left of the red card and this was embossed with clear powder. You can just see this effect along the top of the card. It was difficult to photograph!
The A6 central red card was stamped 6 times with the same stamp. Two more were stamped on individual squares of red, leather textured card which had previously been stamped with some oriental script. The script and flower stamps are by Judikins. The individual squares were mounted on squares of gold card and then mounted onto the red card.
The main image, by the Stampman, was stamped on leather textured card and sprayed with a pale glimmer mist. This was mounted onto gold card which in turn was added to the card using foam pads for extra depth.
Gold thread was wrapped around the spine of the A6 red card and oriental style beads added to the ends of the thread. The A6 card was then taped shut and mounted onto the background card
Subscribe to:
Posts (Atom)